Easy Outdoor Halloween Decor

I don’t usually decorate outside for Halloween, but this year the spirit moved me (and my daughter asked very nicely) to add some outdoor Halloween decor.

Here’s what I came up with. I bought some pumpkins, but other than that, I just used what I already had (minus the poor mums I slaughtered!). I did borrowed a of couple of things from Crys though. She’s like a store… she has EVERYTHING to decorate with! 😉

Happy Friday! Enjoy!

BENCH DECOR HALLOWEEN 3

outside Halloween decor

It was a gorgeous day! See how happy the pumpkin pillows are??

outside Halloween decor

Firewood and pumpkins in a basket at the foot of the bench.

outside halloween decorating

My “Haunted House” picture taken at twilight.


Fall Decor Home Tour

Today I’m taking you on a Fall decor tour of my creative and talented friend’s home. Crys is the maker of the Fall wreaths I posted a week or so ago.

Fall is Crys’s favorite season and she demonstrates this in her home. Every room is touched with a little bit of Autumn. Come take a look around.

outside Fall decoration

The front door is decorated with garlands of leaves, flowers and pumpkins.  You can see a close-up of the gorgeous wreath she made HERE.

Fall decoration

A wreath and little touches of fall makes her entry warm and welcoming.

crys halloween 4

Crys set her dining room table with red tones of Fall. This dining room table will need to be another post. She made it out of old sewing machine stands, reclaimed wood and a glass top, all of which she already had. I’m not a dining room girl myself, but this table is beautiful!

crys halloween 6

Crys used leaves, mini pumpkins and gourds to decorate her mantle. The clock on the wall was a antique/thrift find! She spray painted it to match her the colors in that room. Yes, I’m jealous of the clock. I wish I had seen it first! 😉 And the mantel backsplash… she did herself! Yep, we are DIY soul sisters! 😀 I will have to do a post on this mantel too.

crys halloween 5

Her shelf is decorated with leaf picks, pumpkins and gourds and antique jars filled with more antique goodies. The metal piece on the wall was another antique/thrift find. She spray painted it white and added black stain to it.

outdoor fall decoration

Gorgeous outside fall decoration

Crys and her Hubby have the most gorgeous backyard. When you’re back there, it feels like you are on vacation somewhere else. This beautiful fireplace is just part of the back deck and patio. Again, she used leaf garland, pumpkins, gourds and flowers to decorate.

crys halloween 8

Thanks you Crys for letting me show off your Fall decorated home! Crys inspired me to put planters and flowers on my front porch. Actually she was the one to play in the dirt, making sure the green plant thingys were planted correctly. That’s a first time in 10 years my front porch had anything on it beside a welcome mat. I’m just hoping she will come over and keep these living things alive for me. That’s not too much to ask, is it?


More Fall Wreaths

Here’s the Fall wreath my friend, Crys, made me.  I’m a happy girl!

I blogged about the beautiful wreath Crys made for herself here.  She kindly offered to make one for me.  I gave her just minimal supplies to work with, because I was going for a simple look, and here is what she came up with… It’s exactly what I wanted. 😀

wreath LauriesIsn’t it gorgeous?? This wreath will be hanging here until it’s time for Christmas. Hmmm, I wonder if I can get her to make a Winter wreath for me too? 😉

crys wreath 3

This is the wreath Crys made for herself. You can see why I said yes when she offered to make mine!

wreath Yarn

Here are a couple more Fall wreaths from previous years. You can see how I made this here. It’s a simple wreath, made with yarn and felt.

wreath Laurie burlap wreathBurlap and Fall picks wreath. You can how it’s made here.

Simple Fall Decorating Ideas

Fall is my favorite time of the year.  But when it comes to Fall decorating indoors, I keep it simple.

To “embellish” the house this year, I made a couple of things, bought a couple of things from my favorite Etsy store, CereusArt, and used some decorations I already had on hand.

spider in flowers

To make this creepy spider, I used a turquoise Christmas ornament, 4 pipe cleaners, some googly eyes and hot glue. All I did was take off the hanging part of the ornament, twisted the middle of 4 pipe cleaners together and glue the pipe cleaners to the top of the ornament where the hanging part goes. After putting the top back on, I hot glued the eyes on. The ornament I used had a top that I could bend out a bit, so it then covered the glued part of the pipe cleaners. Of course this guy had to be blue to match my decor. 😉

spider in flowers  2

I dressed up the Planter Box and Mr. Spider with the pumpkin garland I purchased at CereusArt.

spider web lamp 2

The spiderweb with the black starfish came from CereusArt as well.  I picked up this little owl from Pier 1 for a few bucks.

mantel closeup 2

The pumpkins and the leaf garland came from my Fall “stash”.  I use these items to decorate the mantel. Very simple.

mantel closeup

More mantel decor. The Fall mantel usually stays until Thanksgiving. I add pine cones and switch out the candles after Halloween.

candlesticks together

The pumpkins were leftover from previous Falls.  I took the stems of the top two pumpkins and then hot glued three pumpkins on top of each other. Black “boa” trim was used at the base of the candlesticks.

There you go.  House of 34 Fall decorating for the inside. Very simple, very easy decorating ideas.

Are you a simple Fall decorator or do you go all out for Fall?


Linking to:

Scattered Thoughts of a Crafty Mom


Skip To My Lou

Fall Wreath

Today I’m featuring a gorgeous Fall wreath my friend and neighbor, Crys, made.

Crys is my treasure hunting/get in trouble with buddy.  We both have our moments of insane inspiration and get ourselves trapped in severe cases of “ninety percent-itis”!  For those of you who haven’t heard of this condition, it’s when your brain is so overloaded with creativity, you never quite finish one project before you start the next.

So, to help us focus (NOT!), last month we popped in to Hobby Lobby, just for fun.  And guess what?? All their Fall accessories were out!  We love Fall!! Since we were already there, and all the Fall decorations were 50% off, we bought what we needed to make this year’s Fall wreath. What’s one more project?

Fall wreath

Some of the supplies we bought.

Crys completed hers already!  The wreath turned out BEAUTIFUL!  I asked what she spend on all the materials (and she bought A LOT!) and it only came out to about $30.00.  You can’t buy one premade, this full and gorgeous, without spending a fortune!

fall wreath

The ribbon, burlap, wire frame, and all the picks were 50% off!!

fall wreath

It turned out stunning!

Crys had so much fun putting her wreath together, she was kind enough to offer to do my wreath! WooHoo! Since I was in the middle of my Master bathroom makeover at the time, I was so giddy with excitement about that, I told asked her to come over and get the supplies off my hands immediately! (before she changed her mind!) 😉 HA!

My picks, however, came to a total of 3!  When I was picking out the things to put on my wreath, I was going for a simple, minimal look. Good luck with that, Crys!  We may be back at Hobby Lobby picking out more wreath supplies! Darn. I’m going to just hate doing that. 😉

DIY Table Runner Ideas

I have been searching for a Fall DIY table runner to make.  There are oodles of great ideas out there.  I haven’t decided on what I’m going to make yet, but here are some of my favorites.  While all of these would be great for Fall, many could be used year round.

Being a girl who loves tools, my favorite is the ruler runner.  😉  What’s yours?

Pinned Image

via Country Living

Pinned Image

via Crochet Today

Lacy Table Runner

via Better Homes and Gardens

Pinned Image

via taradennis.com.au

via Just Sew Sassy

Pinned Image

via Carter and Cook Event Company Blog

french runner graphic

via The Shabby Creek Cottage

Pinned Image

via Indulgy

Pinned Image

via Pinterest (specific source unknown – please let me know if you find it)

via Diary of a Quilter

Pumpkins Galore

It’s Fall y’all!  Well, maybe not quite yet, but it is September!

Yes, it’s ninety degrees outside.  Yes, the humidity is ridiculous.  And yes, the first cool front has not graced me with its presence.  I can wait another day or two. Or 3 to 4 weeks.  I’m a relatively patient girl.  😉

My mantle is already decorated for Fall.  I’m thinking about jeans and sweaters and boots.  And pumpkin bread!  And falling leaves.  And crisp blue skies.  And more Fall decor!

I found some great pictures of pumpkins decorated in  “non-traditional” ways.  My head is spinning!  So many ideas!  Hope you enjoy.

(Click on Pumpkin Picture for Source)

Black and White

Hand painted pumpkin on a stand.

Drilled Pumpkins

Just circles!

Fall Pumpkins

Stacked pumpkins in different colors.

Paint Them

Painted gold polka dots.

Pack & Ship Autumn Favorites

Pumpkins in a display box.

Tack Them

Decorated with upholstery tacks.

Painted black and white.

Pumpkins as a chandelier.

From Debbie Peavy in Buford, Georgia

Painted, stenciled, decoupage?

Monogrammed.

Funny zombie faces!

Glittered pumpkins.

Owl Pumpkin

What a hoot!

Funny Face Pumpkin

Sew cute!

Boo-tiful Button Pumpkin

BOO button pumpkin.

Fall Wreath

It’s not Fall just yet, but it’s coming and I am ready!  If you have been to any craft store, home decor store or clothes store, you will see that I’m not the only one ready for the season to change!  I love Fall!

So to get into the spirit, I have made my first fall wreath of the season.  Yarn wreaths is popular on Pinterest and Etsy.  They are so pretty and easy to make.

I used a pool noodle to make the wreath.  They are cheap and I happened to have on in my laundry room.  My kids know how to swim, so I figured they wouldn’t miss it.  Read on to see how I added a little bit of support to the noodle.

Pool noodle.

Hanger.  (Just a little FYI about me… I pronounce hanger with a hard “G”.  Drives my mom crazy!  It’s a lot of fun!!  Love you mom! 😀

First I uncurled the hangy part of the hanger. (I have declared “hangy” a word by the way 😉 )

Untwist the neck of the hanger.

Pressed the hanger together and duct tape it so there were no pointy ends showing.

Insert the taped end of the hanger in to the pool noodle.

Tape the other end the same way and insert it in the other end of the noodle. Bend the hanger slightly to keep the noodle round.

Bring the ends together and duct tape it.

Now you are ready to cover your wreath with yarn, fabric, burlap, ribbon, etc.   Note: This hanger in the pool noodle is an idea that I came up with after making several other pool noodle wreaths.  If the wreath you are working on is heavy, there is a chance it will sag a bit when it’s hanging.  So, not only will the hanger help the noodle stay together when duct taping, it also gives it some strength.

After wrapping and wrapping and wrapping the noodle with orange yarn, I decided to add blocks of different fall colored yarn.  I didn’t have a plan as I was wrapping.  Mostly switched colors because I was getting bored! ha!  All the yarn I had from various projects, so this wreath was almost free! 😀

wreath Yarn2

I bought the “H” and the felt for the flowers at Michaels.  It was my intention to paint the “H”, but I ended up liking the pop it gave the wreath.

wreath Yarn3

The flowers were super easy to make!! For the little buds, I used this blog for inspiration and instructions.  The loopy flower tutorial came from this blog.  Both of these flowers were made from felt.  I used fabric for the big white flower.  The instructions can be found here.  While this tutorial shows sewing the flowers to a felt back, I was too lazy to get my sewing machine set up and just used hot glue instead.  Works either way.

wreath Yarn


Pumpkin Bread Recipe

I’m not a fan of cooking or baking.  Yes, I do feed my family at least two out of three meals a day, sometimes even seven days a week.  But it’s not my thing.  So, if you ever see a recipe on my blog… you can be sure it’s awesome and worth making!

This recipe came from my friend Kerry.  She loves to bake and share her recipes.  Enjoy!

Ultimate Pumpkin Bread
Yields 2 Medium Loaves

Ingredients

3 cups all-purpose flour
1 tsp ground cloves
2 tsp ground cinnamon
1 tsp ground nutmeg
1/2 tsp salt
1 tsp baking soda
1/2 tsp baking powder
3 cups granulated sugar
1 cup butter, really soft, half melted really
3 large eggs
1 16 oz can of pure pumpkin
1 tsp. vanilla

1/2 cup chopped pecans (optional)

FROSTING:

1 1/2 cups powdered Sugar
2 Tbsp. melted butter
milk  (as much as you need for desired frosting thickness)

Method

1. Preheat oven to 350˚F and spray two medium loaf pans with nonstick cooking
spray.

2. In a medium bowl, mix the flour, spices, salt, baking soda, and baking
powder and set aside.

3. In the bowl of a stand mixer with the wire whisk attached, dump in the
sugar. Take the butter and put it in the microwave for about 30 seconds, so that
it is half melted. Dump it into the sugar. Add the eggs. Cream these three
ingredients together on medium speed for about 2 minutes or until fluffy. Add
the pumpkin, and vanilla and combine well.

4. In three batches, add the dry ingredients and mix gently until each batch
is just incorporated. Scrape the sides between each batch.

5. Pour half of the batter into a one of the prepared pans. Fold the pecans
into the remaining batter and then pour it into the other prepared pan. Bake
side-by-side for about one hour or until an inserted toothpick or knife comes out clean and the top is golden.

6.  Remove from pans and cool completely before frosting.  (I like to let the frosting run down the sides of the loaf.)

Fall Wreath

fall wreathHello!  It’s the first full week of school and the end of August.  I can hardly believe it will be September in a couple of days!  I love Fall!  I know it’s still ninety degrees outside, but a girl can dream.

I have made this year’s first fall wreath.  It’s currently hanging on the inside of my house, but come September 1st, it’s going to be on the outside of the door!  I’m ready, first cold front, do you hear me?

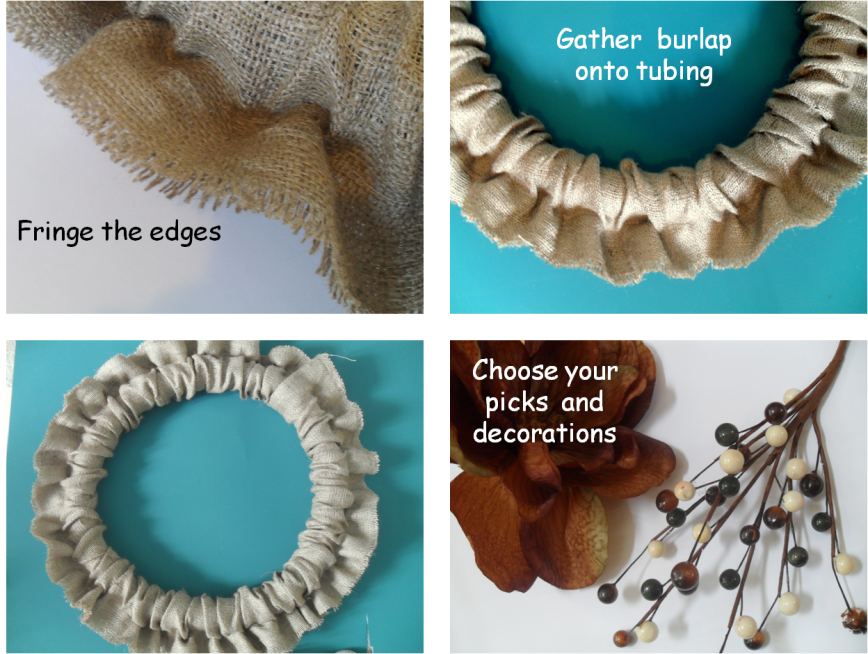
I found the insulation tubing at Lowes for about a dollar.  Styrofoam forms are expensive, I think. Either that or I’m just cheap, so this was a bargain! Here’s how I made it…

  • Cut insulating foam tube to the size “wreath” you want.
  • Cut a 12 inch x 3 yards of burlap and folded it in half width-wise.
  • Sewed a 2 1/2 in seam allowance.
  • Slide the burlap on the foam tube.
  • Cut a piece of left-over tubing on the score line and roll it up tight and cover the ends with duck tape.  I pushed the left-over piece into the ends of the tubing before duct taping the circle together.  It helps hold the circle together while applying the tape.
  • Finish gathering the burlap to cover the duct tape.
  • Fray the edges and decorate.

Michael’s has an awesome selection of Fall picks and decorations! : )  I could spend a day in there!

fall wreath

wreath Laurie burlap wreath

Okay Fall… I’m ready!